MFC、WTL、DuiLib、QT、Skia、OpenGL。
Android里面的画图分为2D和3D两种: 2D是由Skia 来实现的,3D部分是由OpenGL实现的。
窗口
对用户来说, 窗口就是手机屏幕, 包括下面的那些home、back按键、状态栏等。对于Activity来说, 窗口就是除系统状态栏和系统按键的屏幕区域, 有window之类的概念。对于wms来说, 它没有什么窗口的概念, 它能接受的只是一个个view而已。也就是Activity这里还有Window这个概念, 但在wms那里, 已经没有window的概念了。
窗口类型分为应用程序窗口: 就是一般应用程序的窗口, 比如我们应用程序的Activity的窗口。子窗口: 一般在Activity里面的窗口, 比如TabActivity。系统窗口: 系统的窗口, 比如输入法、Toast、墙纸等等…系统窗口不需要对应任何Activity, 也不需要有父窗口, 对于应用程序而言, 理论上是无法创建系统窗口的, 因为所有的应用程序都没有这个权限, 然而系统进程却可以创建系统窗口。WindowManager.LayoutParams里面有关于各种窗口的type类型定义, type还有个含义就是窗口的z-order, 值越大, 显示的位置越在上面。
Window、PhoneWindow
顶层窗口样式和行为的抽象类, 概括了Android窗口的基本属性和基本功能。该类实例的getDecorView()方法返回的DecorView被用来作为顶层视图添加到WM中。
创建时机: ActivityThread.handleLaunchActivity ---> ActivityThread.performLaunchActivity --->Activity.attach
WindowManager、WindowManagerImpl、WindowManagerGlobal
与一个特定的Display相关联, WindowManager主要用来管理窗口的一些状态、属性、view增加、删除、更新、窗口顺序、消息收集和处理等。它面向的对象一端是屏幕, 另一端就是 view , 直接忽略我们以前的 Activity 或者 Dialog 之类的东东。WindowManager是一个接口类, 其真正的实现是WindowManagerImpl, 后者同时也是整个应用程序中所有Window的管理者。
Activity
Activity是支持显示UI的, 但不直接管理view树或者ViewRoot, Activity并没有与这两者产生直接的联系, 是通过中间 “Window”的对象。
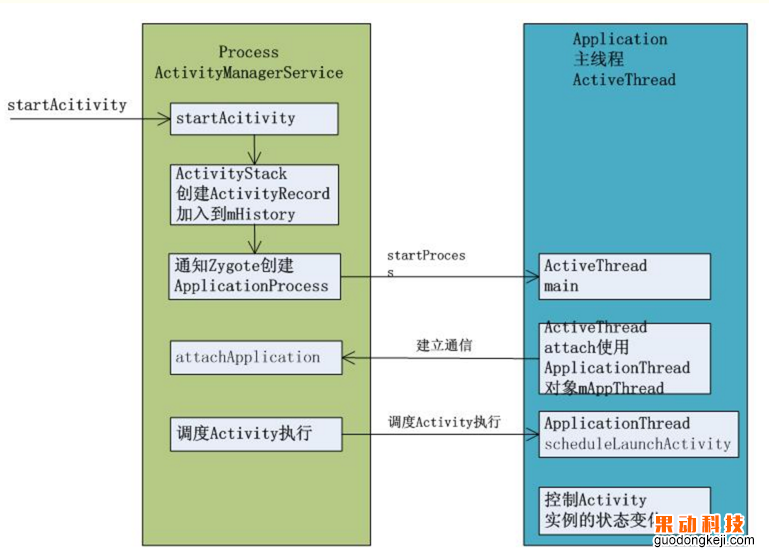
创建过程: 1>、 使用代理模式启动到ActivityManagerService中执行;
2>、 创建ActivityRecord到mHistory记录中;
3>、 通过socket通信到Zgote相关类创建process;
4>、通过ApplicatonThread与ActivityManagerService建立通信;
5>、ActivityManagerService通知ActiveThread启动Activity的创建;
6>、ActivityThread创建Activity加入到mActivities中并开始调度Activity执行;
7>、ActivityThread.handleLaunchActivity ---> ActivityThread.performLaunchActivity
ViewRoot、ViewRootImpl
任何显示在设备中的窗口如: Activity、Dialog等, 都包含一个ViewRoot实例。ViewRoot可以被理解为“View树的管理者”, ViewRoot中的mView成员变量指向的就是它所管理的View树的根。ViewRoot的核心任务就是与WindowManagerService进行通信, 从ViewRootImpl到WMS间的通信利用的是IWindowSession, 而反方向则是由IWindow来完成的。ViewRoot与ViewRootImpl的功能是一样的, 只不过是Android不同版本的不同称呼。
创建时机: ActivityThread.handleResumeActivity ---> WindowManager.addView---> WindowManagerGlobal.addView添加一个view到VM中时, 与添加的view实例一一对应。
AcitivityManagerService
AMS提供了一个ArrayList mHistory来管理所有的activity, activity在AMS中的形式是ActivityRecord, task在AMS中的形式为TaskRecord, 进程在AMS中的管理形式为ProcessRecord。是个独立的系统服务进程。
ActivityThread
管理应用进程的主线程的执行(相当于普通Java程序的main入口函数), 并根据AMS的要求(通过IApplicationThread接口, AMS为Client、ActivityThread.ApplicationThread为Server)负责调度和执行activities、broadcasts和其它操作。ActivityThread是每一个应用程序所在进程的主线程, 循环消息处理。ActivityThread与AcitivityManagerService的通信是属于进程间通信, 使用binder机制;
WindowManagerService
对系统中的所有窗口进行管理。WindowManager是运行在Application process中的, WindowManagerService是在system_server进程中运行, 两者的通信是通过中间的会话层IWindowSession来进行的。
附:相关简化类结构
public class Activity { private Window mWindow; final void attach(...) {
        mWindow = PolicyManager.makeNewWindow(this);
    }
} public class PhoneWindow extends Window{ private DecorView mDecor;
} //它们分别用于表示View树的根节点、ViewRoot以及Window的属性 public final class WindowManagerGlobal { private final ArrayList<View> mViews = new ArrayList<View>(); private final ArrayList<ViewRootImpl> mRoots = new ArrayList<ViewRootImpl>(); private final ArrayList<WindowManager.LayoutParams> mParams = new ArrayList<WindowManager.LayoutParams>();
} public final class ActivityThread { private void handleLaunchActivity(ActivityClientRecord r, Intent customIntent) {
    } final void handleResumeActivity(...) {
    }
} WmS收到用户消息后需要把消息派发到窗口, View类本身并不能直接接收WmS传递过来的消息, 真正接收用户消息的必须是IWindow类, 而实现IWindow类的是ViewRoot.W类。
触屏消息 ----> WindowManagerService ----> ViewRoot ----> decor view ----> Activity ----> 传递给指定的View。
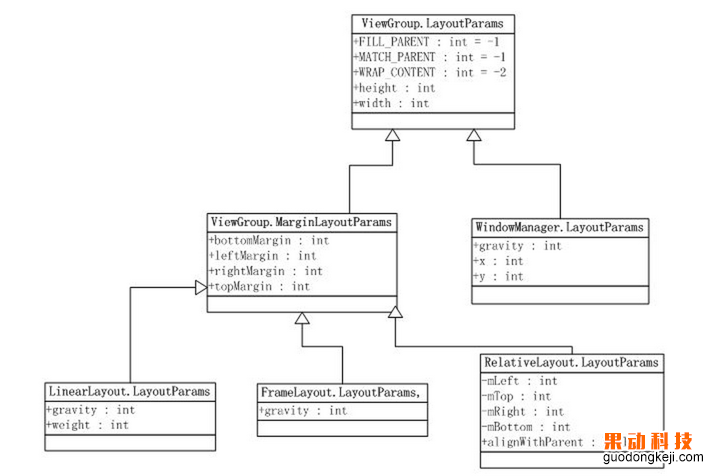
用来保存xml中每个控件的属性值。View通过LayoutParams类告诉其父视图它想要的大小(即, 长度和宽度), 因此, 每个View都包含一个ViewGroup.LayoutParams类或者其派生类。
public class View implements Drawable.Callback, KeyEvent.Callback, AccessibilityEventSource {
    ... protected ViewGroup.LayoutParams mLayoutParams;
    ...
}
ViewGroup子类可以实现自定义LayoutParams, 自定义LayoutParams提供了更好地扩展性, ViewGroup.LayoutParams及其常用派生类的类图(部分类图)如下:
LayoutInflater利用XML解析器将布局文件解析成一个完整的View树, 所有Xxx.xml的布局文件都需要解析成一个完整的View树。
 public View inflate(XmlPullParser parser, ViewGroup root, boolean attachToRoot) {
        final AttributeSet attrs = Xml.asAttributeSet(parser); View result = root;

        // Temp is the root view that was found in the xml
        final View temp = createViewFromTag(root, name, attrs, false); ViewGroup.LayoutParams params = null; if (root != null) {
            // Create layout params that match root, if supplied
            params = root.generateLayoutParams(attrs); if (!attachToRoot) {
                // Set the layout params for temp if we are not // attaching. (If we are, we use addView, below)
                temp.setLayoutParams(params);
            }
        }

        // Inflate all children under temp
        rInflate(parser, temp, attrs, true, true);

        // We are supposed to attach all the views we found (int temp)
        // to root. Do that now. if (root != null && attachToRoot) {
            root.addView(temp, params);
        }

        // Decide whether to return the root that was passed in or the
        // top view found in xml. if (root == null || !attachToRoot) { result = temp;
        } return result;
    }
从上面得知, 我们将View的AttributeSet属性传递给generateLayoutParams()方法, 让其构建合适地LayoutParams对象,并且初始化属性值weight和height。但更重要的是, ViewGroup的子类可以重载generateLayoutParams方法, 返回特定的LayoutParams对象, 例如: 对于LinearLayout而言, 则是LinearLayout.LayoutParams对象。
我们知道Activity中的PhoneWindow对象会创建了一个DecorView(父类为FrameLayout)窗口顶层视图, 然后通过LayoutInflater将xml内容布局解析成View树形结构添加到DecorView顶层视图中id为content的FrameLayout父容器上面。到此, 我们已经知道Activity的content内容布局终会添加到DecorView窗口顶层视图上面。那么, DecorView是怎么添加到窗口的呢?这时候我们不得不从Activity是怎么启动的说起, 当Activity初始化 Window和将布局添加到PhoneWindow的内部类DecorView类之后, ActivityThread类会调用handleResumeActivity方法将顶层视图DecorView添加到窗口上。
handlerResumeActivity方法的实现:
 final void handleResumeActivity(IBinder token,
            boolean clearHide, boolean isForward, boolean reallyResume) {
        ... if (r.window == null && !a.mFinished && willBeVisible) {
                r.window = r.activity.getWindow(); View decor = r.window.getDecorView();
                decor.setVisibility(View.INVISIBLE);
                ViewManager wm = a.getWindowManager();
                WindowManager.LayoutParams l = r.window.getAttributes();
                a.mDecor = decor; l.type = WindowManager.LayoutParams.TYPE_BASE_APPLICATION; l.softInputMode |= forwardBit; if (a.mVisibleFromClient) {
                    a.mWindowAdded = true;
                    wm.addView(decor, l);
                }
            }
    ...
    }
WindowManagerImpl 中addView方法:
 public void addView(@NonNull View view, @NonNull ViewGroup.LayoutParams params) {
        applyDefaultToken(params);
        mGlobal.addView(view, params, mDisplay, mParentWindow);
    }
WindowManagerGlobal 中addView方法:
 public void addView(View view, ViewGroup.LayoutParams params, Display display, Window parentWindow) {
        ...
        final WindowManager.LayoutParams wparams = (WindowManager.LayoutParams)params;
        ...
        ViewRootImpl root; View panelParentView = null;

        synchronized (mLock) {
            ... // If this is a panel window, then find the window it is being // attached to for future reference. if (wparams.type >= WindowManager.LayoutParams.FIRST_SUB_WINDOW &&
                    wparams.type <= WindowManager.LayoutParams.LAST_SUB_WINDOW) {
                final int count = mViews.size(); for (int i = 0; i < count; i++) { if (mRoots.get(i).mWindow.asBinder() == wparams.token) {
                        panelParentView = mViews.get(i);
                    }
                }
            } ///对每个窗口皆构建一个ViewRoot对象 root = new ViewRootImpl(view.getContext(), display); view.setLayoutParams(wparams); ////将窗口对应地view、root、wparams保存在属性集合中 mViews.add(view);
            mRoots.add(root);
            mParams.add(wparams);
        } // do this last because it fires off messages to start doing things try { // 调用ViewRoot对象去通知系统添加一个窗口 root.setView(view, wparams, panelParentView);
        } catch (RuntimeException e) {
            ...
        }
    }
ViewRootImpl中setView的方法:
 View mView; //所有窗口地root View final WindowManager.LayoutParams mWindowAttributes = new WindowManager.LayoutParams(); public void setView(View view, WindowManager.LayoutParams attrs, View panelParentView) { synchronized (this) { if (mView == null) {
                mView = view;
                mWindowAttributes.copyFrom(attrs); //保存WindowManager.LayoutParams属性值  attrs = mWindowAttributes;
                ... int res; /* = WindowManagerImpl.ADD_OKAY; */ requestLayout(); //请求UI开始绘制。 mInputChannel = new InputChannel(); //创建一个InputChannel对象,接受消息  try { //通知WindowManagerService添加一个窗口,注册一个事件监听管道, 用来监听: 按键(KeyEvent)和触摸(MotionEvent)事件。 res = mWindowSession.addToDisplay(mWindow, mSeq, mWindowAttributes,
                            getHostVisibility(), mDisplay.getDisplayId(),
                            mAttachInfo.mContentInsets, mAttachInfo.mStableInsets, mInputChannel);
                }
                ...
        }
    } public void requestLayout() { if (!mHandlingLayoutInLayoutRequest) {
            checkThread();
            mLayoutRequested = true;
            scheduleTraversals();
        }
    } void scheduleTraversals() { if (!mTraversalScheduled) {
            mTraversalScheduled = true;
            mTraversalBarrier = mHandler.getLooper().postSyncBarrier();
            mChoreographer.postCallback(
                    Choreographer.CALLBACK_TRAVERSAL, mTraversalRunnable, null); if (!mUnbufferedInputDispatch) {
                scheduleConsumeBatchedInput();
            }
            notifyRendererOfFramePending();
        }
    } final class TraversalRunnable implements Runnable { @Override public void run() {
            doTraversal();
        }
    } void doTraversal() { if (mTraversalScheduled) {
            ... try {
                performTraversals();
            } finally {
                Trace.traceEnd(Trace.TRACE_TAG_VIEW);
            }
            ...
        }
    }

private void performTraversals() { ... windowSizeMayChange |= measureHierarchy(host, lp, res,desiredWindowWidth, desiredWindowHeight); ... performLayout(lp, desiredWindowWidth, desiredWindowHeight); ... performDraw(); ... } View系统的绘制流程会从ViewRootImpl的performTraversals()方法中开始, 每一个视图的绘制过程都必须经历三个主要的阶段onMeasure()、onLayout()和onDraw()。
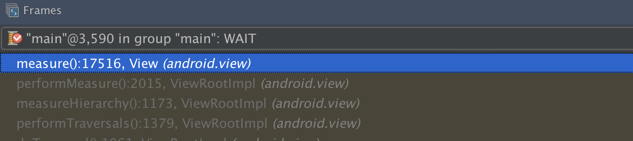
measure函数的作用是为整个View树计算实际的大小, 设置每个View对象的布局大小(“窗口”大小)。实际对应属性就是View中的mMeasuredHeight(高)和mMeasureWidth(宽)。方法中参数widthMeasureSpec和heightMeasureSpec, 这两个值分别用于确定视图的宽度和高度的规格和大小。
MeasureSpec的值由specSize和specMode共同组成的, 其中specSize记录的是大小, specMode记录的是规格。
- EXACTLY 表示父视图希望子视图的大小应该是由specSize的值来决定的。子元素将被限定在给定的边界里而忽略它本身大小;
- AT_MOST 表示子视图多只能是specSize中指定的大小, 开发人员应该尽可能小得去设置这个视图, 并且保证不会超过specSize。
- UNSPECIFIED 表示开发人员可以将视图按照自己的意愿设置成任意的大小, 没有任何限制。这种情况比较少见, 不太会用到。
View中的方法:
 public final void measure(int widthMeasureSpec, int heightMeasureSpec) {
        ... final boolean forceLayout = (mPrivateFlags & PFLAG_FORCE_LAYOUT) == PFLAG_FORCE_LAYOUT; final boolean isExactly = MeasureSpec.getMode(widthMeasureSpec) == MeasureSpec.EXACTLY &&
                MeasureSpec.getMode(heightMeasureSpec) == MeasureSpec.EXACTLY; final boolean matchingSize = isExactly &&
                getMeasuredWidth() == MeasureSpec.getSize(widthMeasureSpec) &&
                getMeasuredHeight() == MeasureSpec.getSize(heightMeasureSpec); if (forceLayout || !matchingSize &&
                (widthMeasureSpec != mOldWidthMeasureSpec ||
                        heightMeasureSpec != mOldHeightMeasureSpec)) { // first clears the measured dimension flag mPrivateFlags &= ~PFLAG_MEASURED_DIMENSION_SET;

            resolveRtlPropertiesIfNeeded(); int cacheIndex = forceLayout ? -1 : mMeasureCache.indexOfKey(key); if (cacheIndex < 0 || sIgnoreMeasureCache) { // measure ourselves, this should set the measured dimension flag back onMeasure(widthMeasureSpec, heightMeasureSpec);
                mPrivateFlags3 &= ~PFLAG3_MEASURE_NEEDED_BEFORE_LAYOUT;
            } else {
                ...
            }

            mPrivateFlags |= PFLAG_LAYOUT_REQUIRED;
        }

        mOldWidthMeasureSpec = widthMeasureSpec;
        mOldHeightMeasureSpec = heightMeasureSpec;
        ...
    } //View中onMeasure默认实现 protected void onMeasure(int widthMeasureSpec, int heightMeasureSpec) {
        setMeasuredDimension(getDefaultSize(getSuggestedMinimumWidth(), widthMeasureSpec),
                getDefaultSize(getSuggestedMinimumHeight(), heightMeasureSpec));
    } protected final void setMeasuredDimension(int measuredWidth, int measuredHeight) {
        ...
        mMeasuredWidth = measuredWidth;
        mMeasuredHeight = measuredHeight;

        mPrivateFlags |= PFLAG_MEASURED_DIMENSION_SET;
        ...
    }
measure()这个方法是final的, 因此我们无法在子类中去重写这个方法, 说明Android是不允许我们改变View的measure框架的。然后在第9行调用了onMeasure()方法, 这里才是真正去测量并设置View大小的地方。之后会在onMeasure()方法中调用setMeasuredDimension()方法来设定测量出的大小, 这样一次measure过程就结束了。
当然, 一个界面的展示可能会涉及到很多次的measure, 因为一个布局中一般都会包含多个子视图,每个视图都需要经历一次measure过程。由父视图在onMeasure中循环调用ViewGroup中的measureChildWithMargins实现子视图的measure过程。
FrameLayout中方法:
 protected void onMeasure(int widthMeasureSpec, int heightMeasureSpec) { int count = getChildCount(); ... for (int i = 0; i < count; i++) { final View child = getChildAt(i); if (mMeasureAllChildren || child.getVisibility() != GONE) {
                measureChildWithMargins(child, widthMeasureSpec, 0, heightMeasureSpec, 0); ...
            }
        }
        ...
    }
ViewGroup中的方法:
 protected void measureChildWithMargins(View child, int parentWidthMeasureSpec, int widthUsed, int parentHeightMeasureSpec, int heightUsed) { final MarginLayoutParams lp = (MarginLayoutParams) child.getLayoutParams(); final int childWidthMeasureSpec = getChildMeasureSpec(parentWidthMeasureSpec,
                mPaddingLeft + mPaddingRight + lp.leftMargin + lp.rightMargin
                        + widthUsed, lp.width); final int childHeightMeasureSpec = getChildMeasureSpec(parentHeightMeasureSpec,
                mPaddingTop + mPaddingBottom + lp.topMargin + lp.bottomMargin
                        + heightUsed, lp.height);

        child.measure(childWidthMeasureSpec, childHeightMeasureSpec);
} ViewRootImpl的performTraversals()方法会在measure结束后继续执行, 为视图进行布局的, 也就是确定视图的位置。并调用View的layout()方法来执行此过程。
ViewRootImpl中的方法private void performLayout(WindowManager.LayoutParams lp, int desiredWindowWidth, int desiredWindowHeight) { ... final View host = mView; host.layout(0, 0, host.getMeasuredWidth(), host.getMeasuredHeight()); ... }可以看到, 这里还把刚才测量出的宽度和高度传到了layout()方法中.
View中的方法:
 public void layout(int l, int t, int r, int b) { if ((mPrivateFlags3 & PFLAG3_MEASURE_NEEDED_BEFORE_LAYOUT) != 0) {
            onMeasure(mOldWidthMeasureSpec, mOldHeightMeasureSpec); mPrivateFlags3 &= ~PFLAG3_MEASURE_NEEDED_BEFORE_LAYOUT; } int oldL = mLeft; int oldT = mTop; int oldB = mBottom; int oldR = mRight; boolean changed = isLayoutModeOptical(mParent) ?
                setOpticalFrame(l, t, r, b) : setFrame(l, t, r, b); if (changed || (mPrivateFlags & PFLAG_LAYOUT_REQUIRED) == PFLAG_LAYOUT_REQUIRED) {
            onLayout(changed, l, t, r, b); mPrivateFlags &= ~PFLAG_LAYOUT_REQUIRED; ListenerInfo li = mListenerInfo; if (li != null && li.mOnLayoutChangeListeners != null) {
                ArrayList<OnLayoutChangeListener> listenersCopy =
                        (ArrayList<OnLayoutChangeListener>)li.mOnLayoutChangeListeners.clone(); int numListeners = listenersCopy.size(); for (int i = 0; i < numListeners; ++i) { listenersCopy.get(i).onLayoutChange(this, l, t, r, b, oldL, oldT, oldR, oldB); }
            }
        }

        mPrivateFlags &= ~PFLAG_FORCE_LAYOUT; mPrivateFlags3 |= PFLAG3_IS_LAID_OUT; }

    protected void onLayout(boolean changed, int left, int top, int right, int bottom) {
    }
layout()方法接收四个参数, 分别代表着左、上、右、下的坐标, 当然这些坐标是相对于当前视图的父视图而言的。在layout()方法中, 首先会调用setFrame()方法来判断视图的大小是否发生过变化, 以确定有没有必要对当前的视图进行重绘, 同时还会在这里把传递过来的四个参数分别赋值给mLeft、mTop、mRight和mBottom这几个变量。
View中的onLayout()方法就是一个空方法, 因为onLayout()过程是为了确定视图在布局中所在的位置, 而这个操作应该是由布局来完成的, 即父视图决定子视图的显示位置。
ViewGroup中的方法
protected abstract void onLayout(boolean changed, int l, int t, int r, int b); ViewGroup中的onLayout()方法是一个抽象方法, 这就意味着所有ViewGroup的子类都必须重写这个方法。在onLayout()过程结束后, 我们就可以调用getWidth()方法和getHeight()方法来获取视图的宽高了。
getWidth()方法和getMeasureWidth()方法到底有什么区别?
getMeasureWidth()方法在measure()过程结束后就可以获取到了, 而getWidth()方法要在layout()过程结束后才能获取到。另外, getMeasureWidth()方法中的值是通过setMeasuredDimension()方法来进行设置的, 而getWidth()方法中的值则是通过视图右边的坐标减去左边的坐标计算出来的。
measure和layout的过程都结束后, 接下来就进入到draw的过程了。
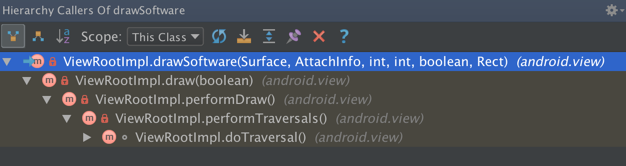
ViewRootImpl里的方法
 private boolean drawSoftware(Surface surface, AttachInfo attachInfo, int xoff, int yoff, boolean scalingRequired, Rect dirty) {
        ... // Draw with software renderer. final Canvas canvas;
        ...//设置canvas mView.draw(canvas);
        ...
    }
View中的方法:
 public void draw(Canvas canvas) {
        ... /*
         * Draw traversal performs several drawing steps which must be executed
         * in the appropriate order:
         *
         *      1. Draw the background
         *      2. If necessary, save the canvas' layers to prepare for fading
         *      3. Draw view's content
         *      4. Draw children
         *      5. If necessary, draw the fading edges and restore layers
         *      6. Draw decorations (scrollbars for instance)
         */ // Step 1, draw the background, if needed int saveCount; if (!dirtyOpaque) {
            drawBackground(canvas);
        } // skip step 2 & 5 if possible (common case) final int viewFlags = mViewFlags; boolean horizontalEdges = (viewFlags & FADING_EDGE_HORIZONTAL) != 0; boolean verticalEdges = (viewFlags & FADING_EDGE_VERTICAL) != 0; if (!verticalEdges && !horizontalEdges) { // Step 3, draw the content if (!dirtyOpaque) onDraw(canvas); // Step 4, draw the children dispatchDraw(canvas); // Step 6, draw decorations (scrollbars) onDrawScrollBars(canvas); if (mOverlay != null && !mOverlay.isEmpty()) {
                mOverlay.getOverlayView().dispatchDraw(canvas);
            } // we're done... return;
        }
        ...
    } protected void onDraw(Canvas canvas) {
    } /**
     * Called by draw to draw the child views. This may be overridden
     * by derived classes to gain control just before its children are drawn
     * (but after its own view has been drawn).
     */ protected void dispatchDraw(Canvas canvas) {

    }
onDraw为空方法, 因为每个视图的内容部分肯定都是各不相同的, 这部分的功能需交给子类去实现。dispatchDraw这一步的作用是对当前视图的所有子视图进行绘制。但如果当前的视图没有子视图, 那么也就不需要进行绘制了。因此你会发现View中的dispatchDraw()方法又是一个空方法,而ViewGroup的dispatchDraw()方法中就会有具体的绘制代码。onDrawScrollBars 是对视图的滚动条进行绘制。
窗口的UI终是需要通过SurfaceFlinger服务来统一渲染的, 而SurfaceFlinger服务在渲染窗口的UI之前, 需要计算基于各个窗口的Z轴位置来计算它们的可见区域。而WindowManagerService服务就是负责计算好每一个窗口的Z轴位置之后, 还需要将它们设置到SurfaceFlinger服务中去, 以便SurfaceFlinger服务可以正确地渲染每一个窗口的UI。
本站文章版权归原作者及原出处所有 。内容为作者个人观点, 并不代表本站赞同其观点和对其真实性负责,本站只提供参考并不构成任何投资及应用建议。本站是一个个人学习交流的平台,网站上部分文章为转载,并不用于任何商业目的,我们已经尽可能的对作者和来源进行了通告,但是能力有限或疏忽,造成漏登,请及时联系我们,我们将根据著作权人的要求,立即更正或者删除有关内容。本站拥有对此声明的最终解释权。